
Getting Started in CourseDog
Scheduling Basics
Building Out a Section
Reviewing and Managing Your Work
Help and Support
What is Coursedog?
CourseDog is an Integrated Academic Operations platform. It integrates academics (curriculum) and scheduling in one place.
There are four (4) Coursedog pillars:
- Class Scheduling
- Syncs curriculum changes in real time, reduces errors with meeting patterns, identifies conflicts, and allows for scheduling workflows
- Curriculum Management
- Allows for the submission of course and program proposals
- Event Scheduling
- Manages campus spaces (rooms) with the ability to align academic and event calendars
- Catalog Management
- Syncs curriculum changes in real-time for scheduling and facilitates the creation of a digital catalog
Some new terminology…
| Term | Definition |
| Activity | The Section Editor provides an Activity Log that audits any changes made to existing class sections and updated in real-time. (Format shows MM/DD/YYYY and HH:MM AM/PM). |
| Class Type | For courses with multiple components only (e.g., lecture and lab) – Enrollment Section: students enroll into this component/section – Non-enrollment Section: students do not enroll into this component/section |
| Conflicts | Count of instructor conflicts within your schedule |
| Meeting Pattern | Bell code that indicates the days/times a section is meeting |
| Planning Term | Term that you are scheduling classes for |
| Scheduling Management | Platform within Coursedog where you will schedule classes in |
| Section Editor | Place where you will select sections to schedule |
| SIS | Student Information System, otherwise known as CUNYfirst |
| Submission (Status) | Status of your schedule (not started, in progress, submitted) |
| Submit Schedule | Submit your schedule to the Registrar to be finalized and published |
| Validate Schedule | Process where you will check to see if your completed schedule meets any pre-defined rules |
What’s in a Section?
There are many components that make up a course section. Here, we have an overview of each part and what parts you will typically be able to edit as you build your schedules.
After this page you will learn more about the fields you can edit.
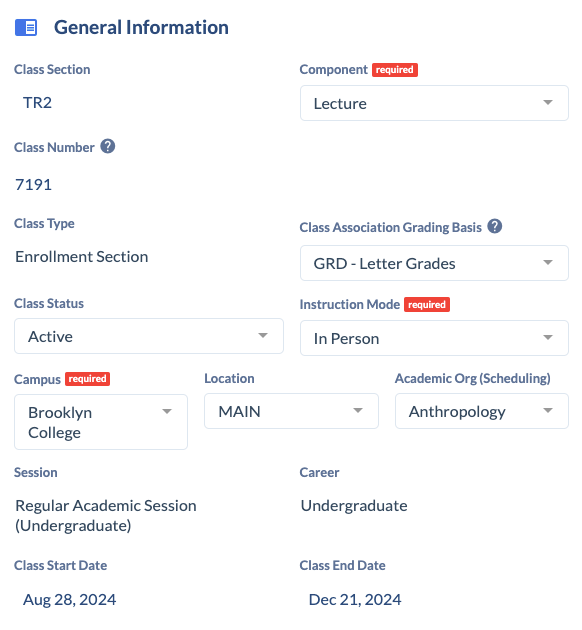
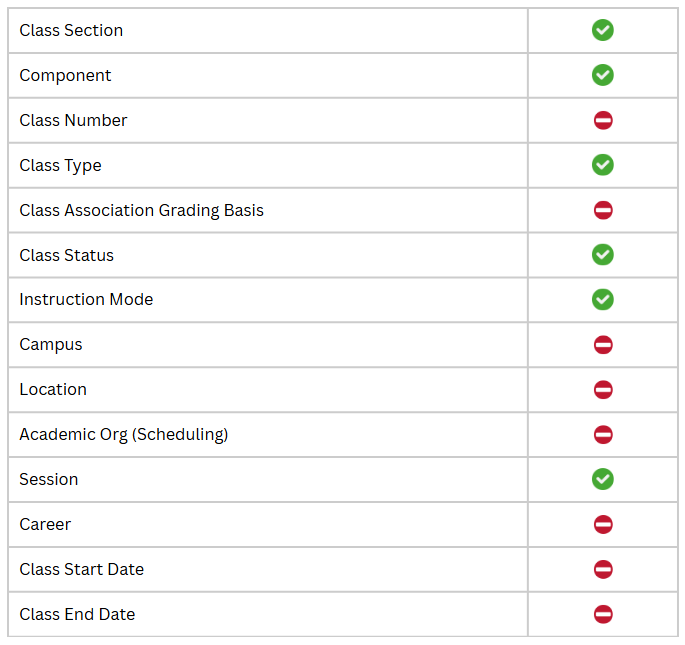
General Information
Meeting Patterns & Rooms
Instructors
Note: If an instructor is brand new and has not taught at Brooklyn College before, a separate request will need to be submitted to add them to your department’s instructor list.

Credits
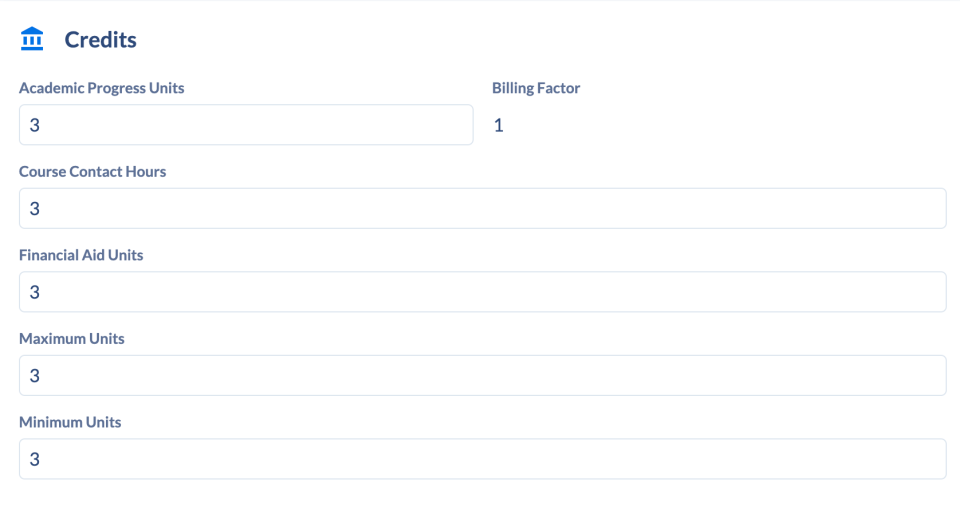
Enrollment Settings
Room Preferences
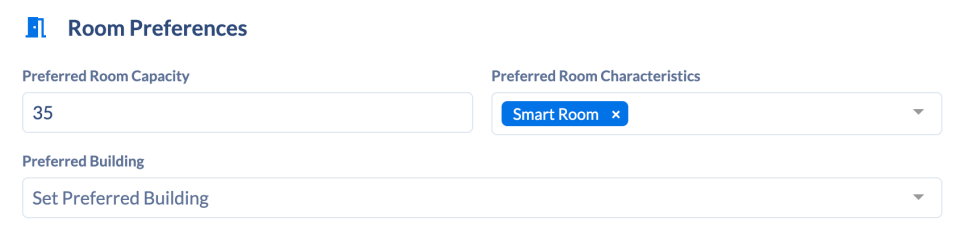
Note: Preferred Room Characteristics and Preferred Building Characteristics may be indicated but are not guaranteed.
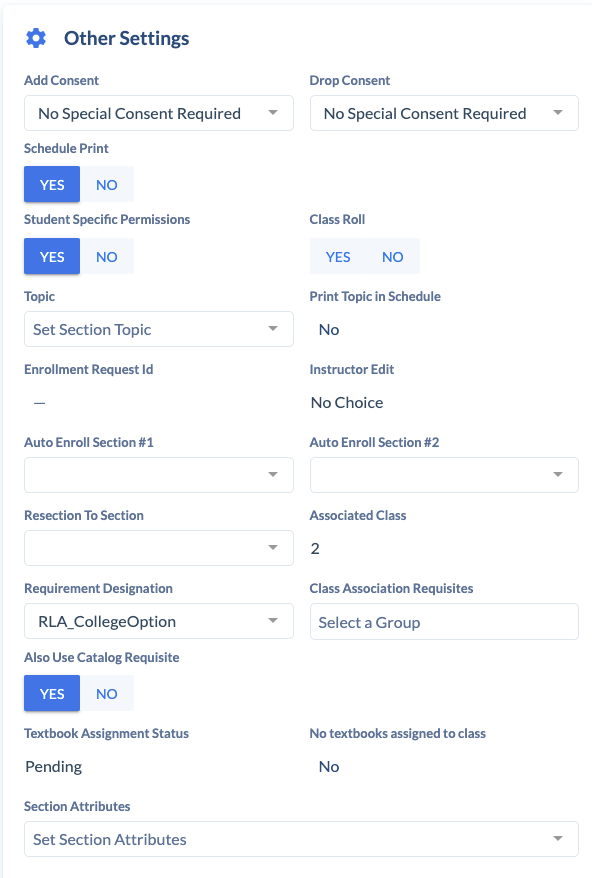
Other Settings
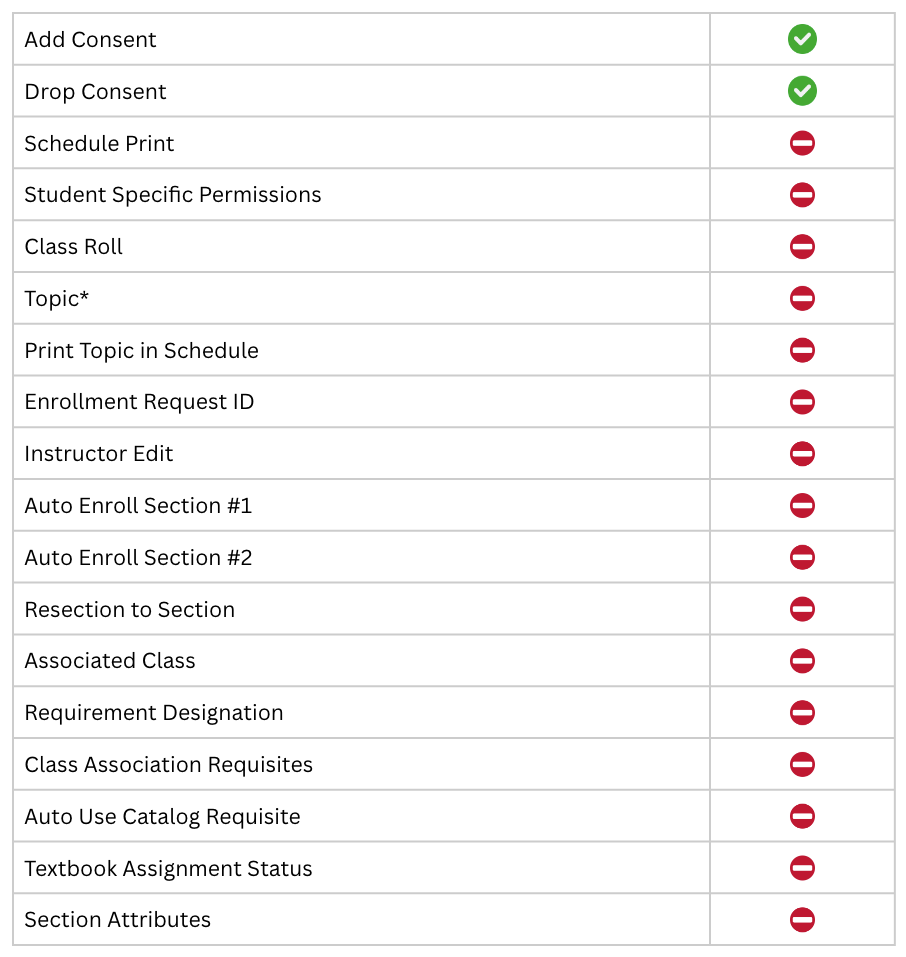
Notes List

Reserve Capacity

Course Materials


Exam Meetings


CourseDog Basics
Accessing Your Schedule
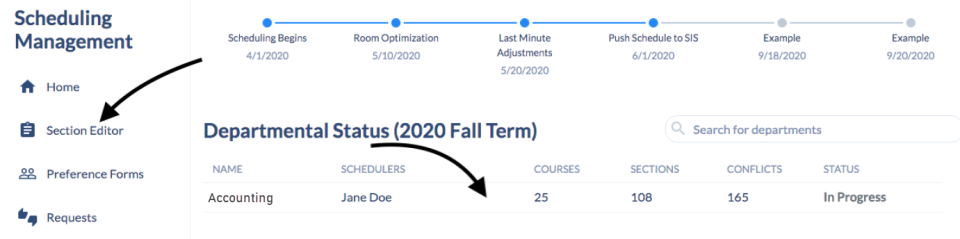
When you have accessed Coursedog, you will see what scheduling phase we are currently in and any academic departments you are associated with.
To begin, you can either click on the Section Editor tab on the lefthand side menu to see all sections that you have access to or click on your academic department under the Departmental Status section.
Section Dashboard
In the Section Dashboard, you see the courses that have been rolled over from the last like-term. For example, if you are viewing the Spring 2025 schedule, you will have a copy of the Spring 2024 sections that were scheduled.
From here, you can edit existing sections, add new sections, or cancel any sections that you are not going to offer.
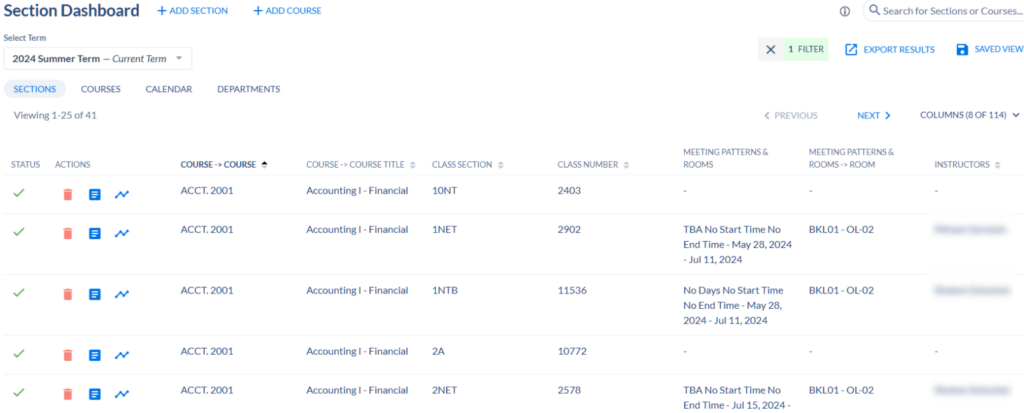
Let’s break down this view a little further…
Below is the default columns that you will see when you open your Section Dashboard.
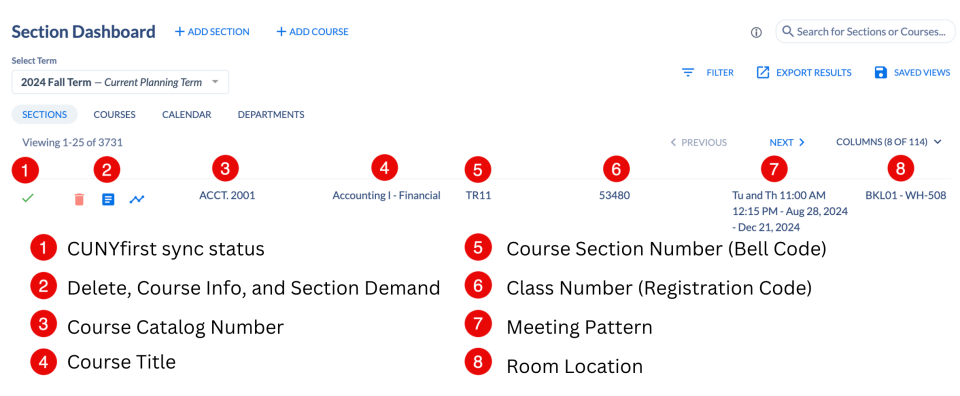
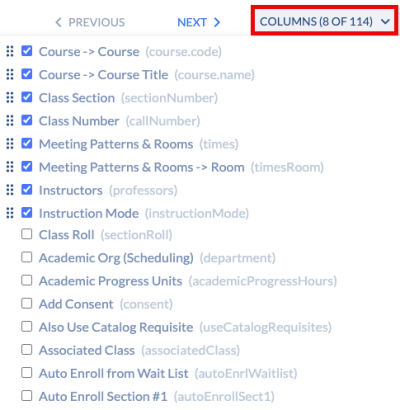
You can customize this further by clicking on Columns. You can further customize the order of the columns by clicking and dragging the dots icons.
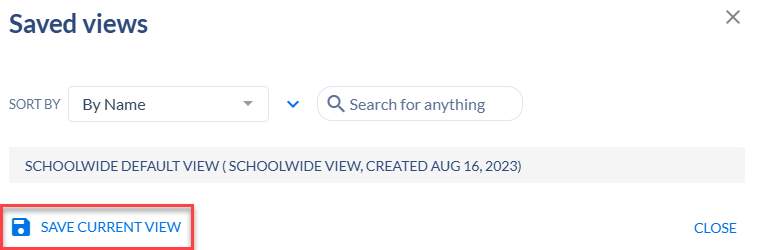
When you are done making changes, make sure you click on the Saved Views button.

Then, click on Save Current View.
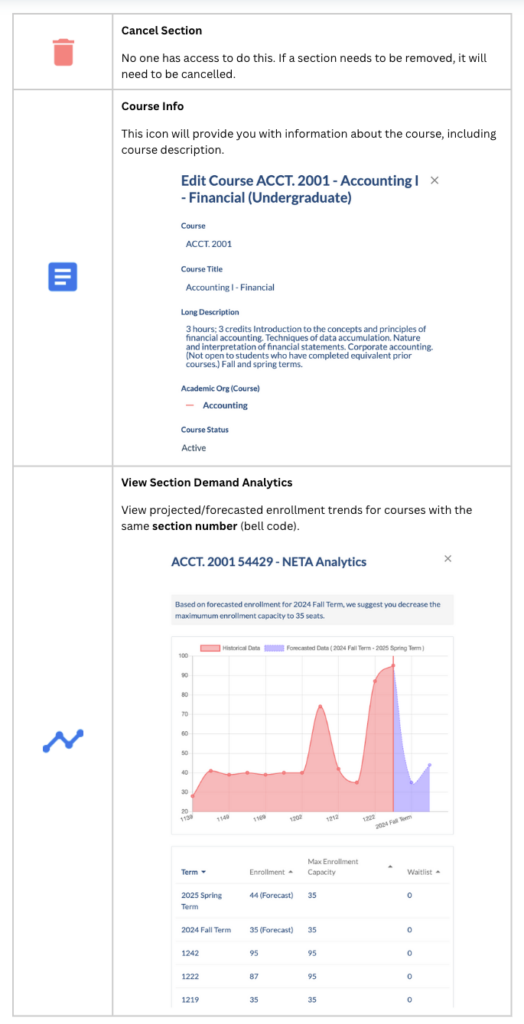
Delete, Course Info, and Section Demand
Before we move forward, let’s talk about these three icons.
Changing Terms
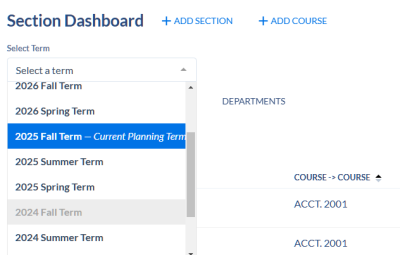
If you are actively scheduling across different terms, use the Select Term drop down to automatically swap over to the other term. Terms that are actively being scheduled will be labeled as Current Planning Term. Once you select a different term, the page will automatically refresh.
Editing an Existing Section
The course schedule is rolled over from like term to like term, like a carbon copy. For example, if you are scheduling courses for the Fall 2025 term, you will see the list of sections that you had offered for the Fall 2024 term. You have the ability to add, edit, and remove sections from this list each semester.
Editing an Existing Section
Double click the section you want to update by double clicking it.
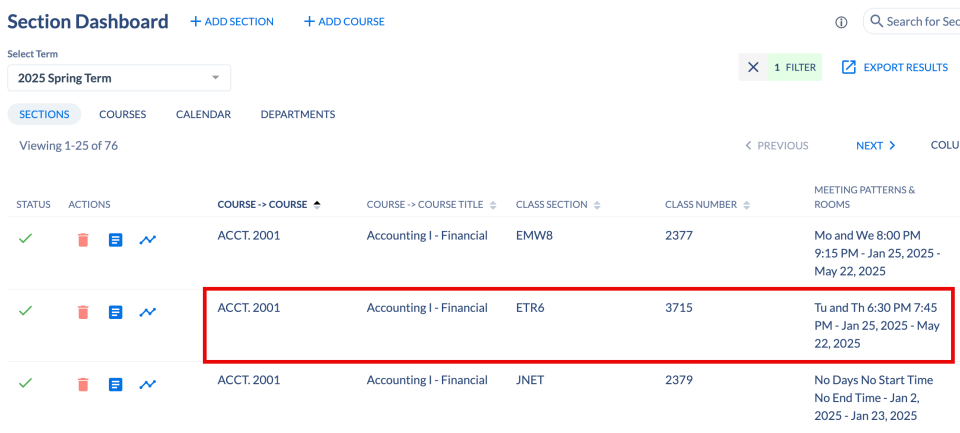
Let’s edit a section…
General Information
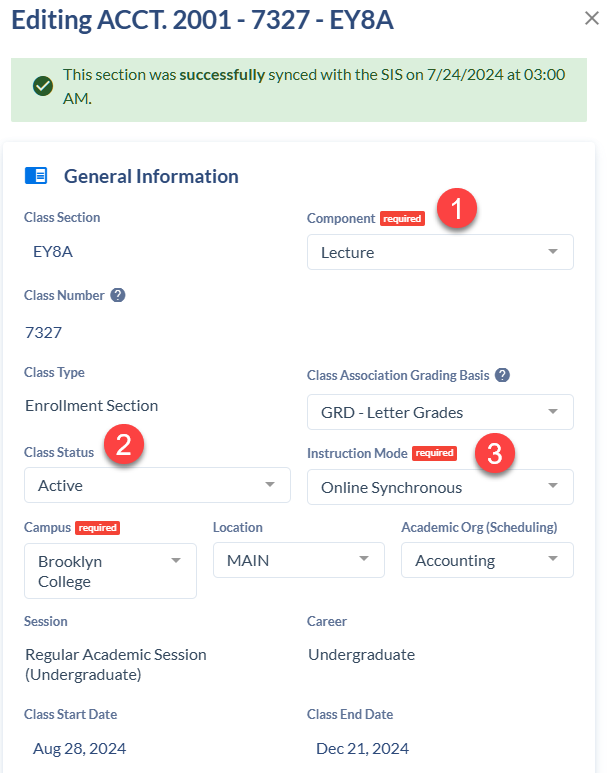
What can you update?
| Field | Description | |
| 1 | Component | If the course has been set up/approved to be taught with multiple components (e.g., lecture, lab, or recitation), you may elect to change this section to another component. NOTE: Courses with multiple components must have all components scheduled. If there are any missing components, the sections will not be available to students to register for in Schedule Builder. |
| 2 | Class Status | Indicate if this course should remain active. Status Definitions: – Active: Section is visible to students and students will be able to register during the registration period – Cancel: Section is to be cancelled. See this page for more information. – Stop Further Enrollment: Section was active and may have student enrollment; students will no longer be able to see this section in Schedule Builder and will not be able to register |
| 3 | Instruction Mode | Indicate the instruction mode (Hybrid Asynchronous, Hybrid Synchronous, Hyfield, HyFlex, In Person, Online Asynchronous, Online Synchronous, or Online Mix) |
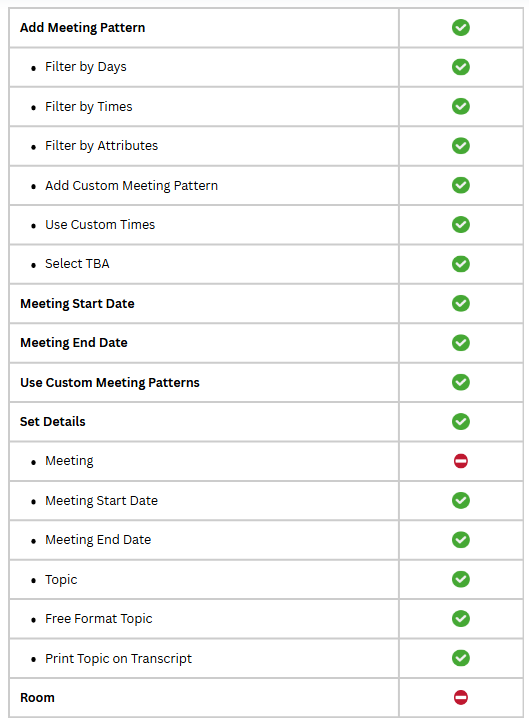
Meeting Patterns & Rooms
Editing an Existing Meeting Pattern
The meeting pattern will carry over. If you want to change it, you can click on the meeting pattern.
NOTE: If you are changing the meeting pattern, you must also change the class section number above.
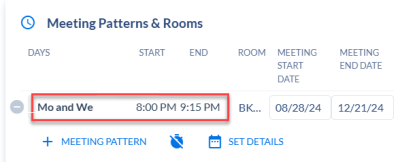
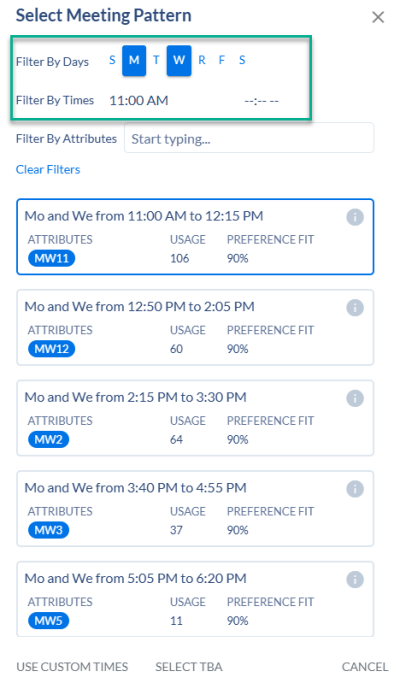
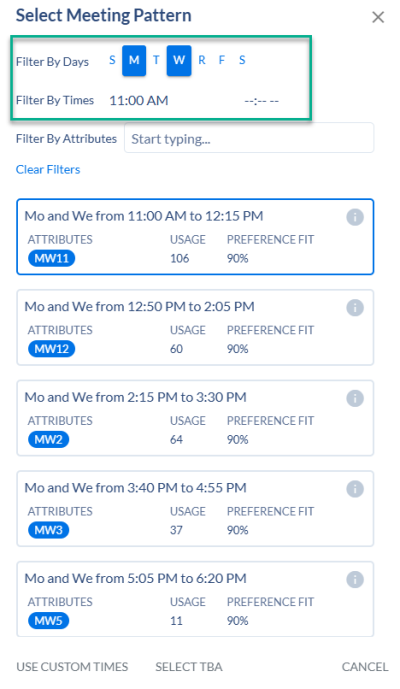
In the window that appears, select the appropriate option from our bell code lists. This option should also match the section number you indicated above. You may use the filter options to help narrow down your results.
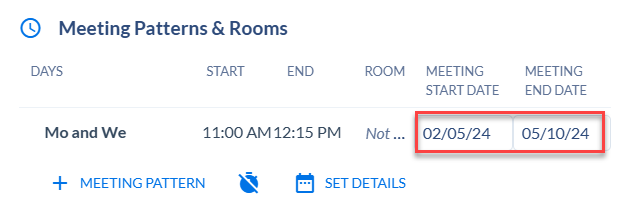
If the class has different meeting dates (within the session chosen), you can indicate this in the Meeting Starte Date and Meeting End Date fields. Otherwise, leave these dates as is.
Adding an Additional Meeting Pattern
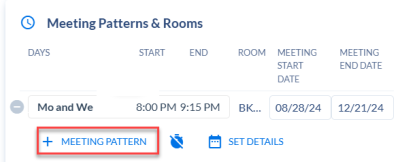
If you need to add another meeting pattern, click on + Meeting Pattern to add the section meeting information using the steps above.
Deleting a Meeting Pattern
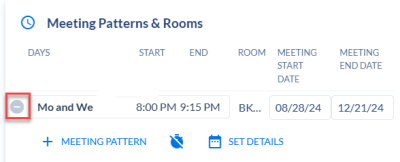
If you want to delete an existing meeting pattern, click on the gray minus sign.
Adding a Meeting Pattern When One Did Not Exist on the Section
Click on + Meeting Pattern to add the section meeting information.
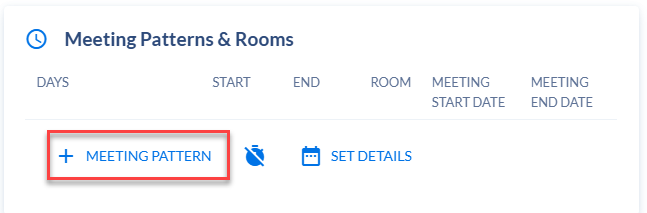
In the window that appears, select the appropriate option from our bell code lists. This option should also match the section number you indicated above. You may use the filter options to help narrow down your results.
If the class has different meeting dates (within the session chosen), you can indicate this in the Meeting Starte Date and Meeting End Date fields. Otherwise, leave these dates as is.
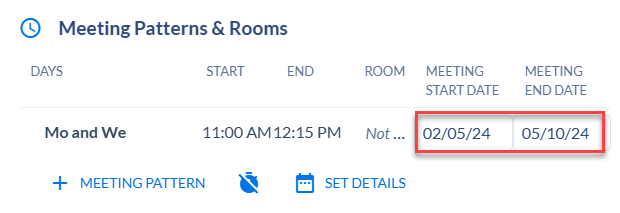
You will not be able to assign a room. This is done by the Office of the Registrar.
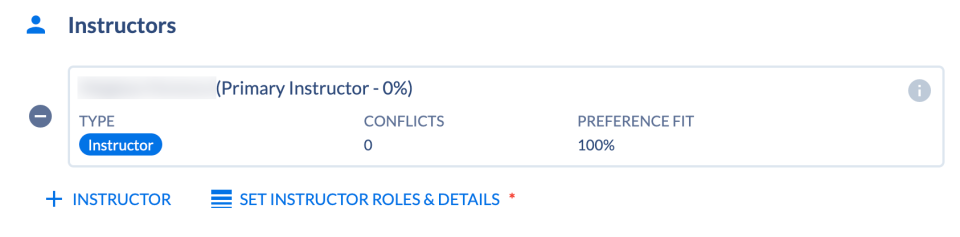
Adding Instructors
The prior instructor will roll over.
If you need to replace this instructor, click on the gray minus sign to remove them.
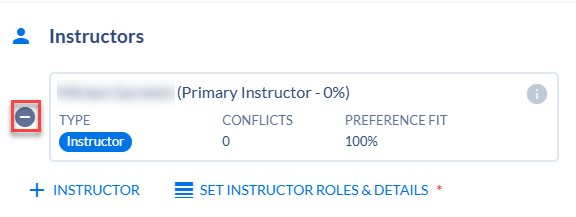
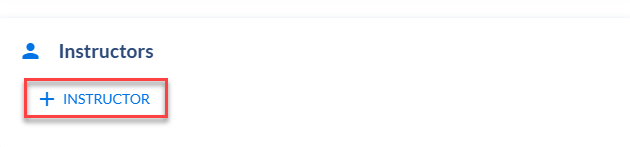
To assign an instructor, click on + Instructor.
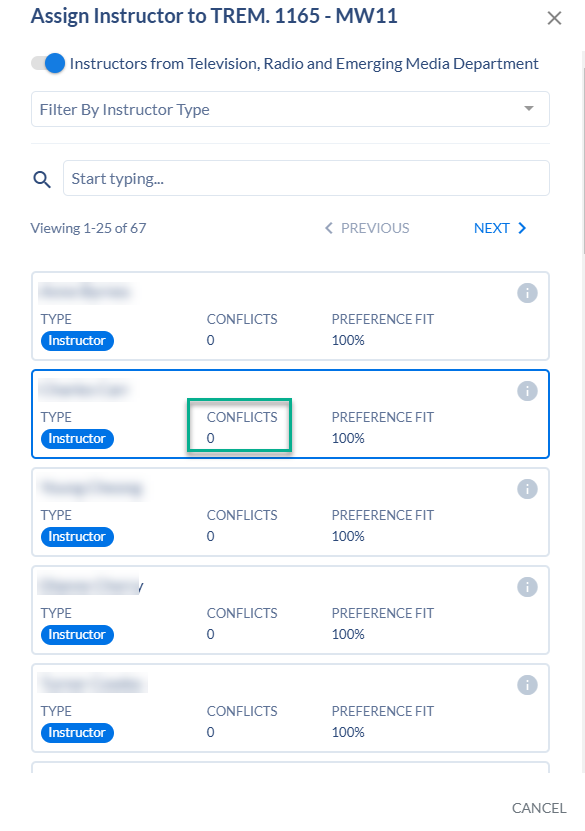
A list of faculty associated with your department will appear. Select them from the list or search for their name. If the faculty member has already been assigned to another section and there is a time conflict, this will be indicated under the Conflicts column.
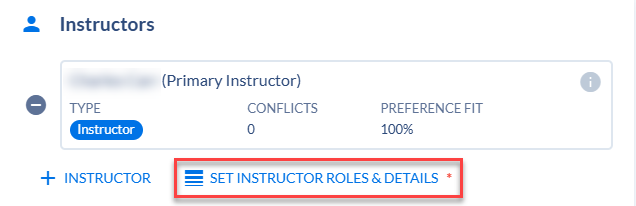
After you have made your selection, click on Set Instructor Roles & Details.
Select the instructor’s name.

Update the fields listed below. When done, click Close.
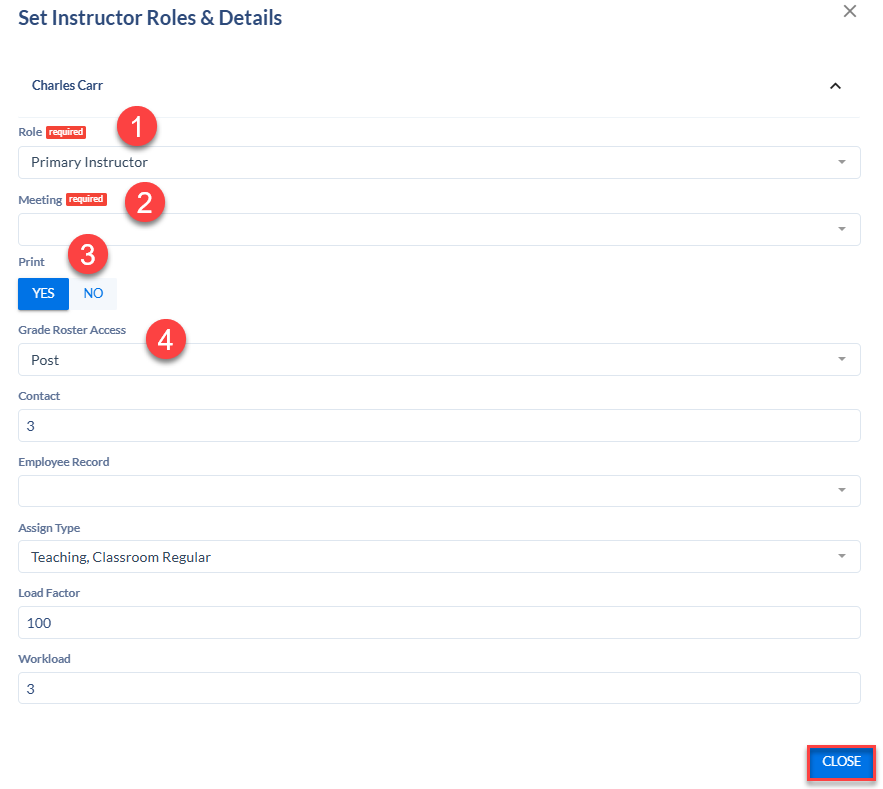
What can you update?
| Field | Description | |
| 1 | Role | Indicate if this instructor is the Primary Instructor, Secondary Instructor, or Teaching Assistant |
| 2 | Meeting | Select the meeting pattern they are associated with |
| 3 | Indicate if they should be printed on the roster. By default, Primary Instructors should be set to Yes. | |
| 4 | Grade Roster Access | Indicate if the instructor should have access to either: – GRADE: Enter grades in the roster and save only – APPROVE: Enter grade in the roster and submit the roster to the Registrar for posting |
Repeat these steps if additional instructors need to be added.
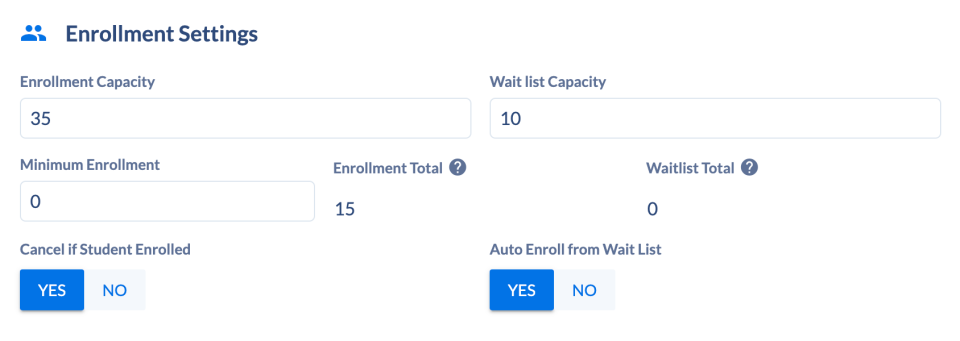
Enrollment Settings
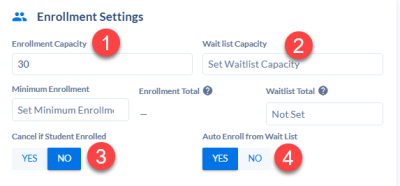
- Let’s indicate how many students you want to open this section to.
- Enrollment Capacity: Type in the max enrollment for the section
- Wait List Capacity: If this section will have a wait list, indicate how many seats you will have allotted
What can you update?
| Field | Description | |
| 1 | Enrollment Capacity | Indicate how many students you want to allow into this section |
| 2 | Wait List Capacity | Indicate how many waitlisted seats, if applicable |
| 3 | Cancel if Student Enrolled | Set to No, always |
| 4 | Auto Enroll from Waitlist | Set to Yes, always |
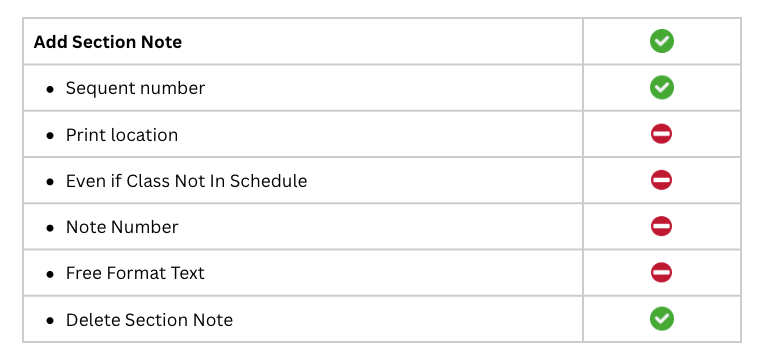
Other Settings
| Field | Description | |
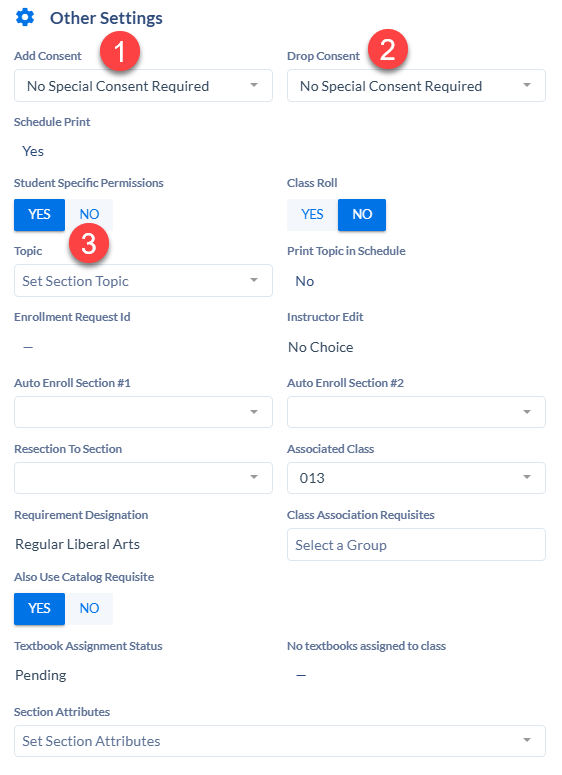
| 1 | Add Consent | Default is set to No Special Consent required. If you want students to contact the department to allow permission into this section, select the Department Consent Required option. Departments will need to enter Class Permissions to facilitate registration. |
| 2 | Drop Consent | Default is set to No Special Consent required. If you want students to contact the department to require students to request permission to drop this section, select the Department Consent Required option. Departments will need to enter Class Permissions to facilitate the dropping of this section. |
| 3 | Topic | If this course is set up as a topics section, select the applicable topic to from this list. |
Notes List (Class Notes)
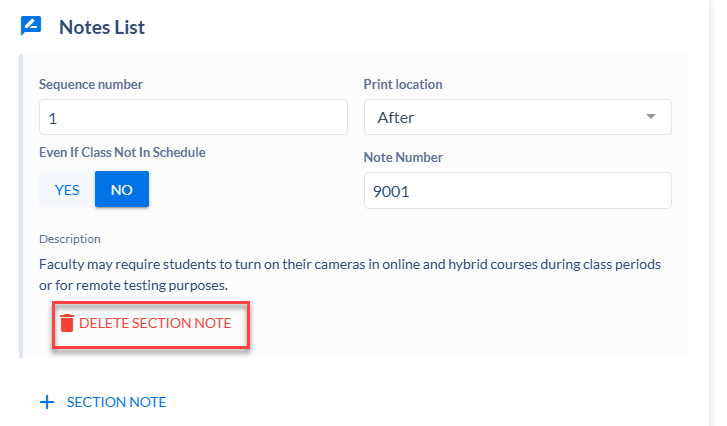
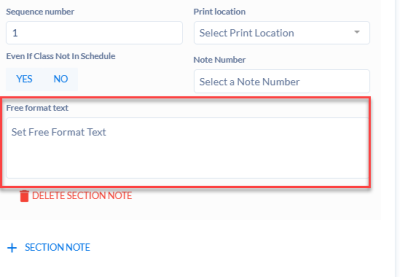
Any prior section notes will roll over. If the note is no longer applicable. Click on Delete Section Note.
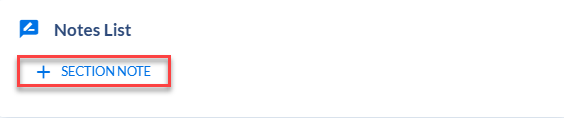
To add class notes, click on + Section Note.
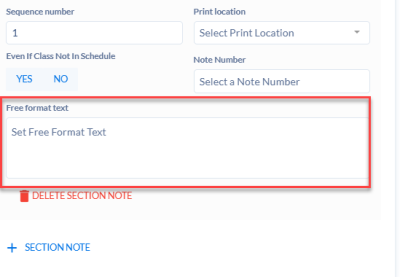
Enter the class notes into the Free format text box.
Done entering your section details?
Click Save Section to save this section.

The page will refresh and you will now be able to see this new section in your schedule.
Adding a New Section
The course schedule is rolled over from like term to like term. This means that the courses you scheduled last Fall will appear in next Fall term’s schedule. You have the ability to add, edit, and remove sections from this list each semester.
Adding a New Course
If you need to schedule a course that was not offered last year, you will need to add the course to your list of courses that you can schedule. To do this, click on the +Add Course button.
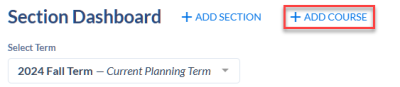
Search for the course in the Select Course field. Then, click on Add Course.
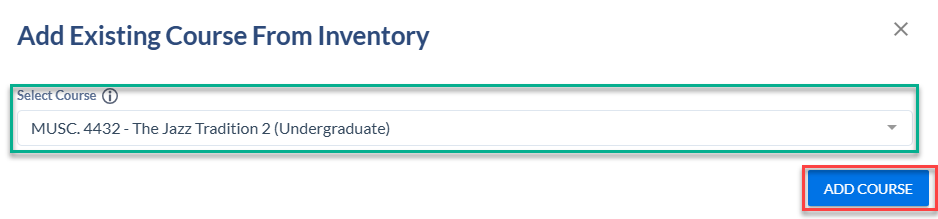
NOTE: If you are trying to schedule a new course and you do not see it listed, it is possible that it has not yet completed its way through the governance process. Please reach out to us for further assistance.
Once you have successfully added the course, move on to Add a New Section.
Add a New Section
If you would like to add a new section of a course, click on the +Add Section button.
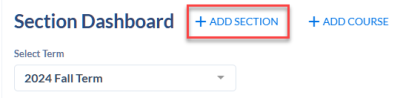
Search for the course that you want to add a section for.
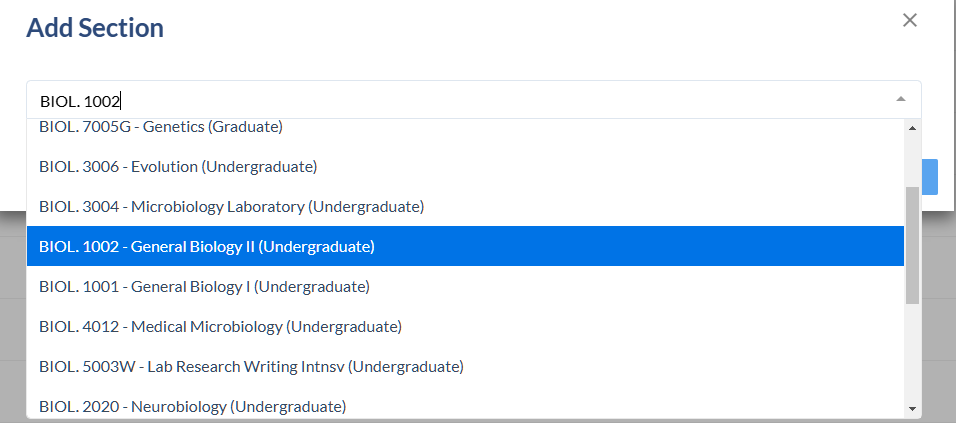
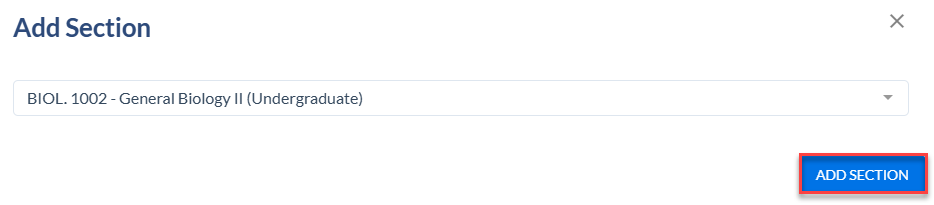
Click on Add Section.
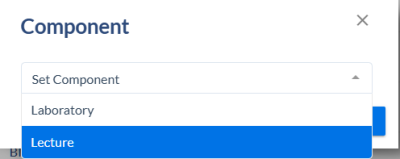
If your course has multiple components (e.g., lecture, lab, or recitation), set a Component to schedule.
- NOTE: Courses with multiple components must have all components scheduled. If there are any missing components, the sections will not be available to students to register for in Schedule Builder.
You can now begin scheduling this section. Make note of any messages/warnings at the top of the screen.
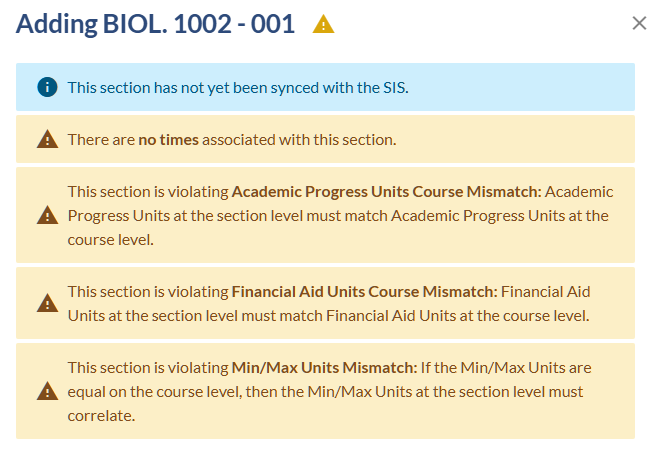
The above is an example of potential messages you may see.
Let’s schedule a section…
General Information
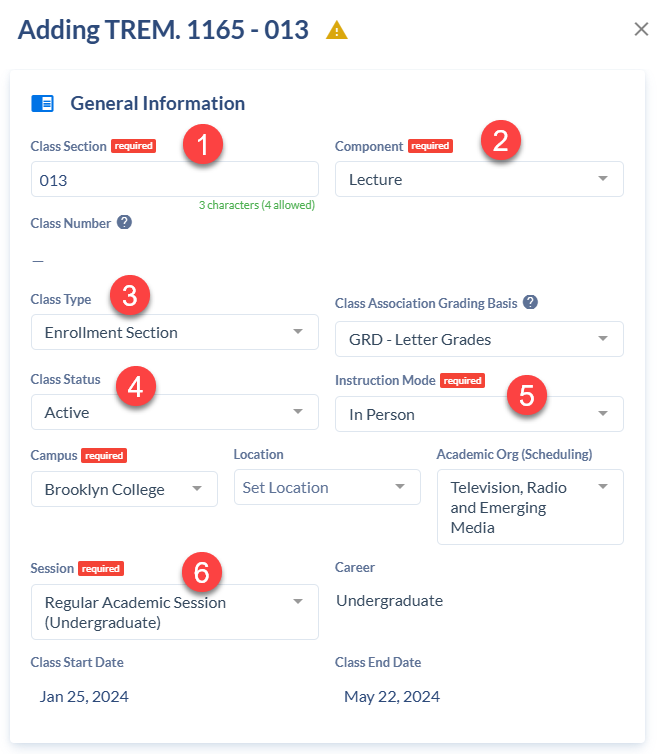
The Class Number will automatically generate when the schedule is migrated into CUNYfirst.
What can you update?
| Field | Description | |
| 1 | Class Section | *This field will auto-populate in numerical order (001, 002, 003) as you add sections for a course. You will need to change the section number as you add each section. Enter the corresponding bell code associated with when you are planning on scheduling the course (e.g., a Fall section meeting on Mondays from 2:15 PM – 3:55 PM will have the MZ2 section number). |
| 2 | Component | Indicate the component of this section, if needed |
| 3 | Class Type | Indicate if this section is an enrollment section or non-enrollment section |
| 4 | Class Status | Set the section as Active, Cancelled, or Stop Further Enrollment Status Definitions: – Active: Section is visible to students and students will be able to register during the registration period – Cancel: Section is to be cancelled. See this page for more information. – Stop Further Enrollment: Section was active and may have student enrollment; students will no longer be able to see this section in Schedule Builder and will not be able to register |
| 5 | Instruction Mode | Indicate the instruction mode (Hybrid Asynchronous, Hybrid Synchronous, Hyfield, HyFlex, In Person, Online Asynchronous, Online Synchronous, or Online Mix) |
| 6 | Session | Indicate which session this class will be held in (e.g., Regular Academic Session, Winter, 5W1, etc.). The Class Start Date and Class End date will automatically update once you choose a section. – Choose the best fit based on when this section will be meeting. – 8-Week sessions are limited to graduate sections only. |
Meeting Patterns & Rooms
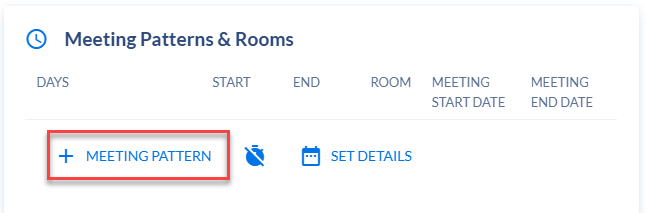
Click on + Meeting Pattern to add the section meeting information.
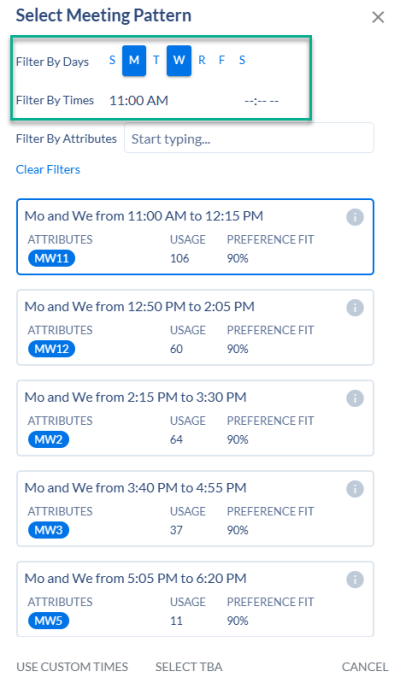
In the window that appears, select the appropriate option from our bell code lists. This option should also match the section number you indicated above. You may use the filter options to help narrow down your results.
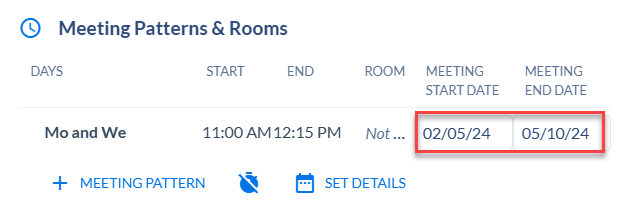
If the class has different meeting dates (within the session chosen), you can indicate this in the Meeting Starte Date and Meeting End Date fields. Otherwise, leave these dates as is.
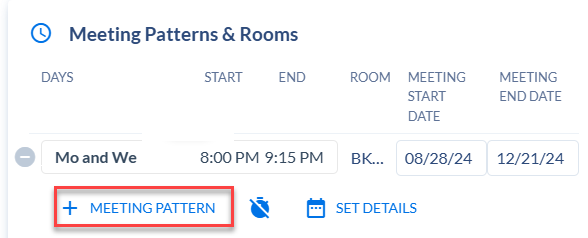
Adding an Additional Meeting Pattern
If you need to add another meeting pattern, click on + Meeting Pattern to add the section meeting information using the steps above.
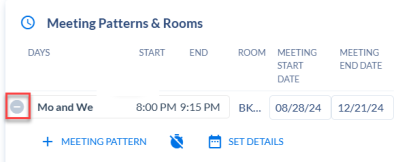
Deleting a Meeting Pattern
If you want to delete an existing meeting pattern, click on the gray minus sign.
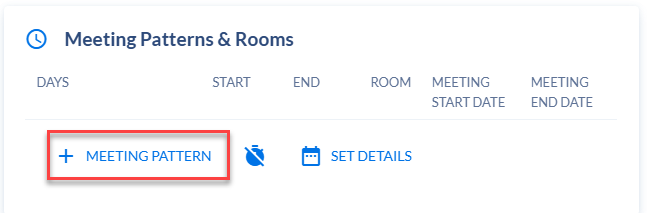
Adding a Meeting Pattern When One Did Not Exist on the Section
Click on + Meeting Pattern to add the section meeting information.
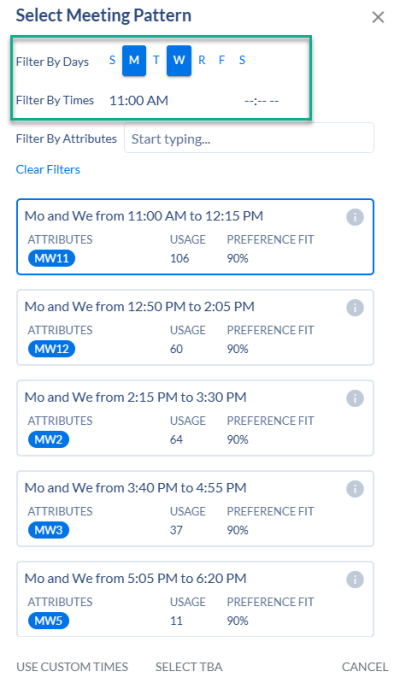
In the window that appears, select the appropriate option from our bell code lists. This option should also match the section number you indicated above. You may use the filter options to help narrow down your results.
If the class has different meeting dates (within the session chosen), you can indicate this in the Meeting Starte Date and Meeting End Date fields. Otherwise, leave these dates as is.
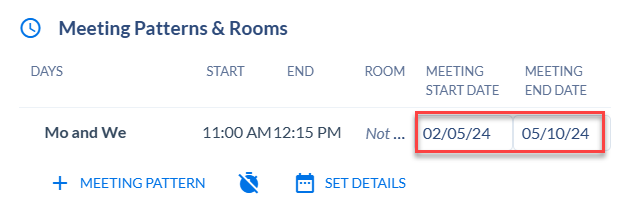
You will not be able to assign a room. This is done by the Office of the Registrar.
Other Settings
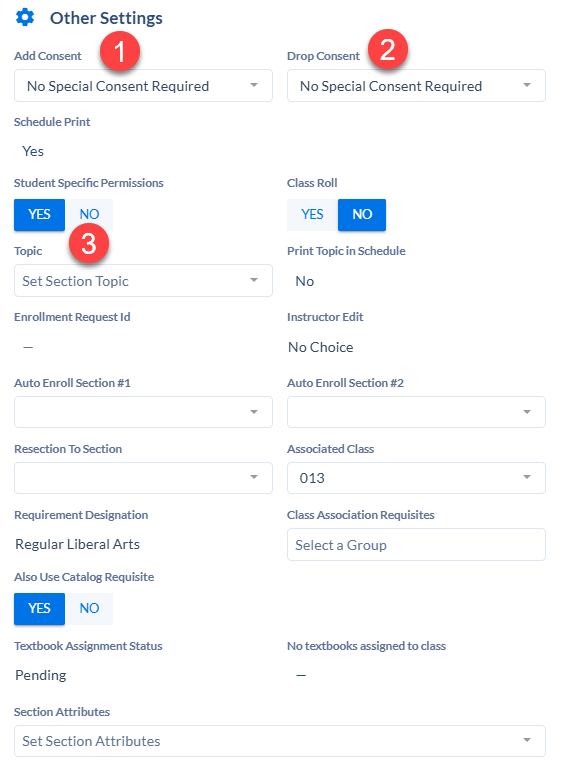
What can you update?
| Field | Description | |
| 1 | Add Consent | Default is set to No Special Consent required. If you want students to contact the department to allow permission into this section, select the Department Consent Required option. Departments will need to enter Class Permissions to facilitate registration. |
| 2 | Drop Consent | Default is set to No Special Consent required. If you want students to contact the department to require students to request permission to drop this section, select the Department Consent Required option. Departments will need to enter Class Permissions to facilitate the dropping of this section. |
| 3 | Topic | If this course is set up as a topics section, select the applicable topic to from this list. |
Notes List (Class Notes)
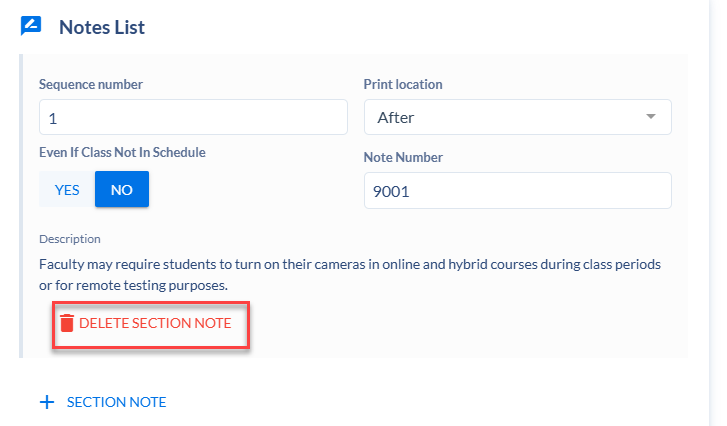
Any prior section notes will roll over. If the note is no longer applicable. Click on Delete Section Note.
To add class notes, click on + Section Note.
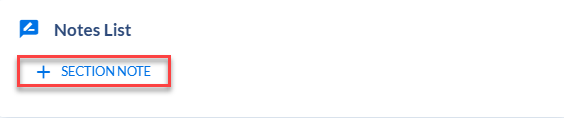
Enter the class notes into the Free format text box.
Done entering your section details?
Click Save Section to save this section.

The page will refresh and you will now be able to see this new section in your schedule.
The Activity Log, SIS Sync, and Comments
The Activity Log
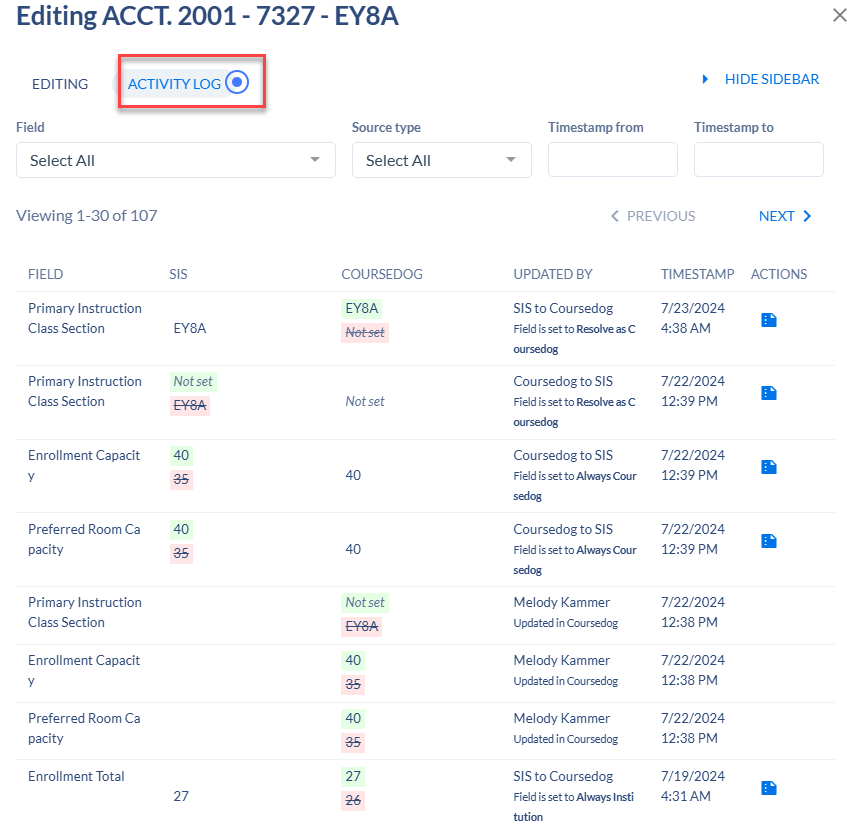
The Section Editor provides an Activity Log that audits any changes made to existing class sections and updated in real-time. You can see who made what changes and when. The Activity Log is available for every section.
Note: If multiple users are looking at the same activity log they won’t see changes until they refresh in the case where a different user initiates a change.
SIS Sync
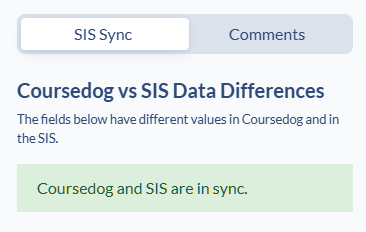
The SIS Sync tab is available for every section. It helps tell us that CUNYfirst and Coursedog are talking to each other and there are no issues with sending scheduling information between each system.
Comments
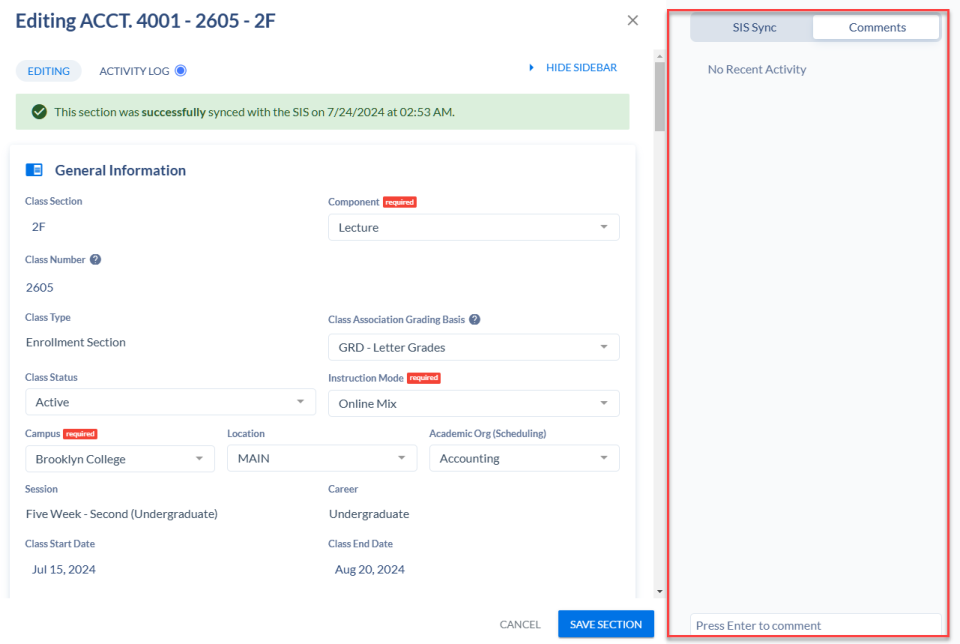
To the right of each section, you will have access to the Comments. Each Comment area is unique to the section that is being scheduled. Here, you can add any comments or notes, as desired. All entries in this section are internal only. Students will not be able to view any text added here.
NOTE: Notes added here will not trigger any action for the Office of the Registrar. It should not be used to send messages to the Scheduling team as no notification will be sent when a comment is added.
Important Dates & Deadlines
Winter/Spring 2027, Summer 2027 & Fall 2027
All Important Dates & Deadlines (Archived Schedules)
Meet Your CourseDog Support Team
Scheduling email- Scheduling@brooklyn.cuny.edu For all questions
Vanessa Ullo
vullo@brooklyn.cuny.edu
Melody Kammer
melody.kammer@brooklyn.cuny.edu
Erin Berman
erin.weinschenk@brooklyn.cuny.edu